|
Trumpeter
Curtiss P-40B
Reviewed by Brad
Hagen
Photos by: Raymond Chung, Vernon Rabbetts, Scott Murphy, Buz
Busby
Development history of the
early P-40's
Curtiss knew that their radial
engined P-36 couldn't be developed any more, so to increase
its life they decided in July 1937 to install an Allison V-1710
inline engine with integral supercharging. Curtiss gave it the
designation of Model 75P and the USAAC gave it the designation
of XP-40.
In order to adapt the liquid
cooled Allison, a considerable amount of replumbing needed to
be done. The carburetor intake for the single stage supercharger
was installed on top of the nose between the nose guns, the
oil cooler was mounted under the nose, and the radiator was
located under the fuselage just aft of the wing.

The XP-40 flew for the first
time on October 14, 1938, the early flight trials were disappointing
and the radiator was gradually moved forward until it reached
its final location. The new radiator intake was designed to
include both the oil cooler and the two coolers for the ethylene/glycol
engine coolant.
On January 25th, 1939 the manufacturers
were invited to submit proposals for a new pursuit aircraft,
Curtiss submitted their XP-40 and were up again such planes
as the XP-39, the XP-43, and the XP-38. Even though the XP-40
couldn't match the performance of some of the other types, it
was chosen because it was based on already proven airframe,
it was less expensive, and could reach production in quantity
at least a year ahead of the others so on April 26, 1939, the
Army ordered 524 production versions under the designation P-40
(Curtiss Model 81).
The P-40 was armed with two
.50 machine guns in the nose and one .30 machine gun in each
wing. Flush riveting was used to reduce drag. Since the P-40
lacked armor for the pilot, self sealing fuel tanks, and a bulletproof
windshield, it was not considered suitable for combat and was
pulled from combat duty on October 22, 1942.
There was no P-40A, although
one aircraft was later given that designation when it was converted
to a photo reconnaissance plane at Bolling Field in March, 1942.
In September, 1940, 131 P-40B's
(Model H81-B) were ordered by the Army and the first P-40B flew
on March 31, 1941. This model received an additional .30 machine
gun in each wing, armor plating, and externally covered self
sealing fuel tanks. The British ordered 110 for the RAF and
they went under the designation Tomahawk IIA (Model H81-A2).

The P-40C (Model H81-B) first
flew on April 10, 1941 and there were 193 built. It received
improved self sealing fuel tanks as well as a 52 gallon drop
tank. The British ordered 930 and designated this version Tomahawk
IIB (Model H81-A2) and they replaced the wing guns with four
0.303 Browning machine guns. The IIA had British radio's installed,
the IIB had US radios. 23 of the IIB's went to the Soviet Union,
and an unknown number went to Turkey and Egypt, 100 went to
China, the rest were used heavily by the RAF and South African
Air Force in the North African theatre where the 112 squadron
of the RAF with its shark mouth insignia became famous.

The Flying Tigers gave the P-40
everlasting fame, but there has been a lot of confusion as to
whether they used the P-40B or P-40C. It turns out that when
the British deferred part of their order for the P-40C, Curtiss
received the order for 100 planes from the Chinese and they
had a number of the P-40B self sealing fuel tanks left over
which they installed. Since the Chinese order didn't specify
drop tanks, they were left off. Even though they were technically
P-40C's, they were actually closer to P-40B's in how they were
equipped.
Introduction
Christmas came early for me
when I received the new Trumpeter 1/32 scale P-40B to review.
Our Associate Editor Vernon Rabbetts received the kit from William
Wang, the president of Trumpeter and he took it over to Raymond
Chung at Lucky Model to photograph and then willingly?? (I'm
still trying to figure out the deep finger indentations in the
box!!) let Raymond and Sylvia Lo send it off to me which they
did by air mail and I received it very fast, thanks guys!!

The kit comes in the typical
very sturdy Trumpeter box with artwork of a British P-40B flying
over the White Cliffs of Dover. Upon opening the box you find
it packed full of six sprues of light gray plastic, one clear
plastic sprue, decals, each of these is in its own separate
bag to minimize scratching, and in another bag is a sheet of
photo etch, acetate instruments, and a hinge for the rudder.
There is a 12 page construction book. I didn't see any flash
and very few injector marks, and those that were there would
either be easy to take care of or wouldn't bother, and I didn't
find any sink holes.
I compared the kit to the best
P-40B drawings I could find which were from the In Action book
and it matched the drawings, I also compared the 1/48 Monogram
P-40B to the same drawings as the kit is known for its accurate
outline and it also matched the drawings. If someone knows of
better P-40B drawings, I would love to get a scan of them or
information on where to buy them. According to Janes Fighting
Aircraft of WWII the following applies:
Length: 9.66 Meters - Trumpeter is: 9.664 mm
Wingspan: 11.37 Meters - Trumpeter is: 11.36 mm
This means that if a real P-40B was reduced down, Trumpeter
would be off by 0.125 of a millimeter in length and 0.355 of
a millimeter in wingspan. That's about his close as you can
get! Now on to the details of this kit...
Engine
The Allison V-1710 in this kit
looks to be like a little jewel of its own, it is easily the
most detailed Allison I have seen yet. Instead of just having
all the detail molded on, it is made up of a good number of
parts, the cooling pipes and wiring harnesses are all separate
parts. Each exhaust pipe is a separate piece and each pipe is
made up of two pieces and when glued together the pipes have
a hollowed out look. The oil cooler and the two coolers for
the ethylene/glycol engine coolant is made up of a number of
pieces including photo etch screens for the front for a more
realistic look and mounts underneath the engine in the middle.
The front air intake has the air ducts going back to each cooler,
but it will be very hard to see anything through it. The engine
attaches to the firewall which attaches to the cockpit making
it one large piece. There are no clear pieces for the cowling
in this kit, I am wondering how much of the engine will be visible
when the model is finished, I will cover this more when I get
to the fuselage.

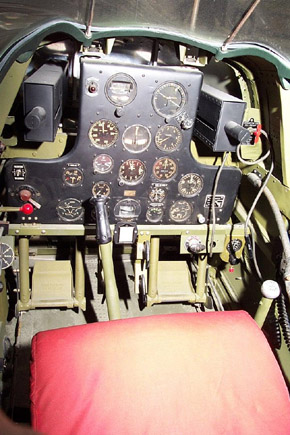
Cockpit
The cockpit is a mixture of
good and not quite so good. The instrument panel is clear and
uses Trumpeter's usual sandwich method with acetate instruments,
the instrument panel looks to be pretty accurate. The rudder
pedals connect to the instrument panel and look to be an accurate
representation.

The floor is completely flat
in the kit while on the real P-40, the floor had a slight downwards
slope going towards the rear of the cockpit because the floor
was the wing. This really isn't much of an issue as in 1/32
scale, you really wouldn't notice it and most of the slope would
be underneath the seat area.
The sidewalls are separate items
from the cockpit which will make things easier if an aftermarket
company makes a cockpit or if you want to scratch build one.
The kit sidewalls look to be an adequate representation of the
P-40B sidewalls except it doesn't look like they got the map
case right, although it will be easy to cut out to cover for
the map case out of plastic or brass and add it. There are a
number of items to add to them which will change their look,
but I looked at the sidewalls and put them underneath the parts
of the trees where they would go on the sidewalls, they look
like they will be good OOB once you fix the map case. Add some
detailing and it will really stand out as the real P-40B had
a sparse cockpit (remember it was inherited from the P-36 giving
it mid-30s technology).
 The
seat has an accurate framework behind it, but the seat just
does not look right. I can't quite put my finger on it and I
don't have the measurements for the real seat, but it either
looks to small or to short, part of the problem is it has what
looks like (if it was the real seat) a rod welded all around
the outside of the seat and that may be part of the problem.
I might try sanding off the rod around the outside of the seat,
but it might be easier to use Rogerio "Rato" Marczak
brass
technique in which he built a seat for his Scratchbuilders
P-40B conversion. There are photo etch buckles, the four belts
are printed on the instructions for you to cut out, but the
instruction paper seems a little too stiff for that and most
will use their favorite material. Here are some photos of a
restored P-40B cockpit, the seat is not close to original. The
seat has an accurate framework behind it, but the seat just
does not look right. I can't quite put my finger on it and I
don't have the measurements for the real seat, but it either
looks to small or to short, part of the problem is it has what
looks like (if it was the real seat) a rod welded all around
the outside of the seat and that may be part of the problem.
I might try sanding off the rod around the outside of the seat,
but it might be easier to use Rogerio "Rato" Marczak
brass
technique in which he built a seat for his Scratchbuilders
P-40B conversion. There are photo etch buckles, the four belts
are printed on the instructions for you to cut out, but the
instruction paper seems a little too stiff for that and most
will use their favorite material. Here are some photos of a
restored P-40B cockpit, the seat is not close to original.
The cutouts behind the cockpit
are separate pieces for each side. The instructions say to paint
them Interior Green, but from the research and color photos
I have seen it looks like they were painted whatever the camouflage
color was then the glass was installed, when the British repainted
them in the field, they didn't remove the glass so the area
behind the glass stay the original camouflage color.
 
Fuselage

The fuselage is really good,
there are a couple minor issues that should be very easy to
fix, there is one problem that will be somewhat noticeable and
harder to fix. The fuselage has fine recessed panel lines with
light rivet detail which is good because the real P-40 had flush
rivets, looking at these two photos of a restored P-40B show
that very close up, you can see the rivet detail, but stand
back a little ways and the rivet detail disappears, I also noticed
that on the real P-40's I have seen.
 
The fin and stabilizers look
like Rosie the Riveter had a bad hair day, it's not that the
rivets are too deep, there are just WAY too many of them. What
I will do is tape off the rivets along the panel lines and fill
in the remaining rivets with filler or primer and sand it smooth
to give it a uniform look with the fuselage and wings.

On the port side of the fuselage
is a hand hold and baggage door, instead of having them as recessed
panel lines, they are raised. The hand hold will be easy to
scribe around and gently sand off, the baggage door will be
a lot harder to fix. The only options I can think of (other
than leaving as is) is scribing around it, sanding it flush
and replacing the rivet detail and the handle, or opening the
baggage door and building the compartment inside. This was the
biggest error I could find on the kit.

The rudder is the only movable
part of the kit, other reviews and build articles of Trumpeter's
kit's have questioned the longevity of these parts and most
suggested gluing them in place. The rudder hinge looks like
it will be fairly sturdy, but only time will tell and you may
want to glue it in place also. Trumpeter must have been listening
because all the other parts are fixed in place, but they give
you a choice of which position to install them. The fabric detail
on all of the parts is a little overdone, but is not grossly
exaggerated like some older kit's. It isn't so much that there
is sag between the ribs, as the fabric is recessed, but they
do show off the framework of all of the fabric parts very well.
I have read other reviews where the reviewer's suggested a light
sanding, that might work here are also, I haven't decided if
I will do that or not. The actuating rod for the rudder trim
tab is a separate piece.
Moving on to the nose of the
plane, the cowling on top of the plane back to the firewall
is one piece and removable, the part behind the cowl over the
cockpit has the .50 machine guns attached, it's not clear in
the instructions if that is to be left removable, the guns are
just glued into holes and the guns aren't overly detailed, if
left removable it would give a lot of area to super detail.
The barrel extensions are actually hollowed out which is a very
nice touch. The backplate is installed inside the nose of the
fuselage. The spinner has a plate installed halfway into the
spinner just like the real P-40, then the propeller is installed
and then a plug to hold it all in place. The instructions are
not clear as to what is to be glued and what should not be glued,
I won't know until I build the kit and get to that point whether
those parts will hold the lower air intake in place. If it does
that will be really nice as you will be able to disassemble
the nose and see the majority of the detail on the engine, if
you can't and can only remove the top of the cowl, a lot of
the lower detail of the engine area will be lost. If you can
remove it, detailing the inside of the cowl area will make a
show stopper. A number of modelers have said they would prefer
not to have the clear pieces for the nose, but with the cowl
panel arrangement on the P-40, it would have been a nice touch
to show off all the detail.

There are clear parts for the
navigation lights for the sides of the fuselage and the fin.
The guns sights on top of the cowl are too plastic pieces, you
also have the option to use a photo etch piece for the rear
ring sight.
While this kit is a P-40B, all
that is needed to convert it to a P-40C is a 50 gallon drop
tank and the shackles to hold it, hopefully an aftermarket company
will come forward for this.
Wings

The wings are nicely detailed
with fine recessed panel lines and subtle rivets. The flap detail
is very good, but there are injector marks between a number
of the flap ribs, but all of them on my kit were recessed which
will make them a lot easier to fill (if you want to show your
P-40 with the flaps down, they were rarely parked that way unless
undergoing maintenance) then it would be to sand off raised
injector marks. You need to choose whether you want the flaps
in the raised or lowered position when you get to that stage
in building to make it easy for you to get the flaps in the
correct position if you want them lowered, they have tabs on
the flaps that will make that simple, if you want them raised,
you just remove the tabs and glue them in position. The area
between the flap and the aileron on the lower wing half has
a very narrow separation piece, take good care not to break
it off as it looks very fragile. That is not a problem of molding,
but the level of detail in the wings.
The wheel well detail for the
most part is very good, considering the P-40 had a simple wheel
well, putting it simply, once the wing was sheeted, a hole was
cut in the wing for the tire to fit, the landing gear laid against
the skin of the wing and the faring covered the landing gear
leg. The top of the wing has the stringers molded in and then
you have the pieces to make the box inside the wing. From the
factory they came with a canvas cover that fit inside the wheel
well, they didn't last long once in the field as they became
a maintenance nightmare. Inside the faring for the landing gear
leg there should be rows of heavy rivets, but the model doesn't
have any, they will be easy to add using a pin and some white
glue if you want to go to that detail level. The landing gear
covers on the faring have good detail on the outside, but not
any detail on the inside.
 
The .30 machine guns are OK
in detail, but there are no open panels to display them, so
all you will see is the last half of the barrel. The wings have
clear pieces for the navigation lights which will make it easy
to paint them a clear color.
Landing gear

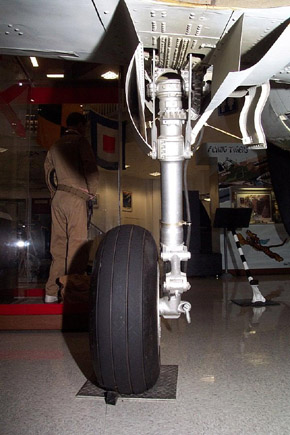 The
landing gear is excellent! The main gear is very nicely detailed,
the supporting struts and both gears are separate pieces, the
gears have one fully round gear and one partial gear which when
added will really make the landing gear looked realistic. I
have only seen photos of the tail gear, but the kit gear looks
very good and better than a lot of tail gears I have seen in
other models. The
landing gear is excellent! The main gear is very nicely detailed,
the supporting struts and both gears are separate pieces, the
gears have one fully round gear and one partial gear which when
added will really make the landing gear looked realistic. I
have only seen photos of the tail gear, but the kit gear looks
very good and better than a lot of tail gears I have seen in
other models.
The tires in this kit are plastic,
no rubber tires here, again, Trumpeter must be listening as
a lot of modelers have requested plastic tires. They give a
good representation of the smooth tread that the P-40's used
on their tires until at least well into 1943. The outside hub
which is smooth and the brakes are separate pieces and very
well molded.
Clear parts

Other than the clear parts I
have indicated above, the clear parts also include the two pieces
for behind the cockpit, the port side has the two holes in them
for the fuel and oil fillers, the canopy, the windscreen, and
the bulletproof glass. The bulletproof glass attaches to mounts
on the windscreen and looks like a gigantic HUD. The clear parts
are very thin, very clear, and the framing is nicely subtle.
I held the clear parts up to the light to see if I could see
any of the little cracks that people have noticed (I have a
small one in my F-105D) but I didn't see any in these pieces.
There is a very fine mold line down the center from top to bottom
on the windscreen (it's even shown on the instructions).
Photo etch and small parts
 Here
is the small metal rod for the rudder, the acetate instruments,
and the photo etch sheet that includes the cooling grills, gun
site, buckles, the hinge for the rudder, the flat plates at
the top are for the flap area. Here
is the small metal rod for the rudder, the acetate instruments,
and the photo etch sheet that includes the cooling grills, gun
site, buckles, the hinge for the rudder, the flat plates at
the top are for the flap area.
Decals
 The
box states the markings are for the British 26th Squadron and
the American markings are for the 18th PG at Pearl Harbor. Vernon
told me that the British markings aren't completely accurate,
the codes for the sides of the fuselage should be mid grey,
the tail band should be sky blue, they are white on the decal
sheet. The paint call outs are Testors MM and Gunze Sangyo and
call for grey on the bottom of the aircraft which should be
sky blue and the spinner should also be sky blue. The
box states the markings are for the British 26th Squadron and
the American markings are for the 18th PG at Pearl Harbor. Vernon
told me that the British markings aren't completely accurate,
the codes for the sides of the fuselage should be mid grey,
the tail band should be sky blue, they are white on the decal
sheet. The paint call outs are Testors MM and Gunze Sangyo and
call for grey on the bottom of the aircraft which should be
sky blue and the spinner should also be sky blue.
From my research I don't believe
the American markings are correct. They show the red circle
in the white star on the blue circle which is correct for that
time period, but they have the markings on each side of the
fuselage, lower port wing and upper starboard wing, there shouldn't
be markings on the fuselage but there should be markings on
both the top and bottom of the wings like in this photo.

This could be accurate for a
later date when they used to P-40B's for training. Hopefully
the aftermarket companies will come out with a number of markings
as there were some colorful P-40B's. Here are a couple profiles
by Vernon Rabbetts as an example:


Conclusion
While I pointed out an area
that would be hard to fix, the decals are a letdown and I did
a bunch of nit-picking, I really like the kit a lot and the
good points WAY out do the bad points and I would recommend
this kit to anyone. It is the first 1/32 injected P-40 since
Revell released theirs in the late '60s, it's been a long wait,
but it was worth it because this really is a great kit. I had
just started to scratch build a J-3 Cub, but after looking this
kit over, everything else got pushed off and this is on my building
table. This is also one of the very few kits I would ever build
more than one of, I like it that much.
I would like to thank Trumpeter
for the sample kit and for Raymond and Sylvia of Lucky
Model for getting it to me so fast, three days from
Hong Kong to Minnesota. Also thanks to Scott Murphy for his
use of the restored P-40B photos (his
website), and Buz Busby for his original photos.
© Brad
Hagen 2003 |