P-40 Warhawk Forums
October 04, 2024, 02:17:18 PM *
Welcome, Guest. Please login or register.

Login with username, password and session length
News: SMF - Just Installed!
 
   Home   Help Search Login Register  
Pages: 1 2 [3] 4 5 ... 8
  Print  
Author Topic: 1:48 Mauve P-40N "Lope's Hope"  (Read 71813 times)
Vince_M
Sr. Member
****
Posts: 321


View Profile
« Reply #30 on: January 20, 2019, 03:17:29 AM »

Here is a DF loop I made myself using craft wire 0.4mm.
It was hard as my eyes are not as good as they used to be.
You will see some action coming.  There is a model show less than two months away!
Logged
Vince_M
Sr. Member
****
Posts: 321


View Profile
« Reply #31 on: January 21, 2019, 01:52:12 PM »

Logged
Mark Joyce
Sr. Member
****
Posts: 408


View Profile
« Reply #32 on: January 22, 2019, 11:28:57 PM »

That cockpit looks great, Vince!  Do you think you'll have the build completed by the upcoming show?
Logged

Ignorance is bliss
Vince_M
Sr. Member
****
Posts: 321


View Profile
« Reply #33 on: January 23, 2019, 01:29:37 AM »

I sure hope I can.
I have two kids and a working wife that travels sometimes.
It is hard to get time at the bench.
However, if I can work a little bit every day there is a chance.
I must say the Mauve kit is nice but there are some issues that are going to take time.
One is the rear canopy because I have to sand it and then polish to make it look right.
Logged
Vince_M
Sr. Member
****
Posts: 321


View Profile
« Reply #34 on: February 04, 2019, 04:46:16 AM »

Logged
Mark Joyce
Sr. Member
****
Posts: 408


View Profile
« Reply #35 on: February 04, 2019, 12:51:12 PM »

Looking good, Vince! Good luck with rescribing that back canopy area; it's an issue I've dealt with in my builds of the kit, with various levels of success. My scribing abilities are best illustrated in an old cartoon titled "Thank God it's Friday," showing the continental railroad finally coming together, but with the railroad misaligned so that only the center rails actually meet while the outer ones don't.

Regarding the canopy, are you asking how best to attach it to the fuselage? I'm not exactly sure what you mean by gluing it without showing.
Logged

Ignorance is bliss
Vince_M
Sr. Member
****
Posts: 321


View Profile
« Reply #36 on: February 04, 2019, 09:59:58 PM »

Mark,

I'm worried about gluing it with some glue seeping behind the clear part.
I may use clear epoxy to attach it or Micro Krystal clear.
Perhaps if I am careful to not use too much but you can see in the picture that the edge of the clear plastic reflects light too.
So I'm wondering if I should paint the edge black...

Vince
Logged
Mark Joyce
Sr. Member
****
Posts: 408


View Profile
« Reply #37 on: February 04, 2019, 11:08:30 PM »

Mark,

I'm worried about gluing it with some glue seeping behind the clear part.
I may use clear epoxy to attach it or Micro Krystal clear.
Perhaps if I am careful to not use too much but you can see in the picture that the edge of the clear plastic reflects light too.
So I'm wondering if I should paint the edge black...

Vince

I often use Krystal Clear (or another type of watch cement) with no problems.  Although wary about it on clear parts, I've also carefully applied Tamiya Extra Thin Cement with a thin brush.  Since you have dipped the windscreen in Future, you should also be able to use Superglue with no worries about fogging.  Never have tried the epoxy method personally.

I don't think I've ever painted the edge of a clear part, but I have used a Sharpie along the edges of those clear parts that go in the scallop area behind the cockpit on the earlier P-40 versions.  Those clear parts never seem to fit well so I've done that to prevent the reflection you are concerned with.  My only concern about trying it on the windscreen is how either a Sharpie or paint would effect the glue bond.

Good luck with whatever method you use!
Logged

Ignorance is bliss
Vince_M
Sr. Member
****
Posts: 321


View Profile
« Reply #38 on: February 05, 2019, 11:35:03 PM »

Thanks, Mark.
Normally, I would used epoxy or superglue and then perhaps sand/polish (which I have already done with the back canopy).
This part fits really well though and I'll try Micro Krystal Clear which I really like.
I see Hasegawa's way is better in that they moved the glue joint somewhere else to hide it.
I'm going to try what I see a lot of guys do and just attach the front canopy after paint.
Also, I will carve a channel for a "weep run" to keep globs of glue from the inside showing up. 
At least with Krystal clear I could "do over" if I want.
Just running out of time and I lost this past weekend due to a relative visiting and staying in the basement, cutting me off from my workbench....
Logged
Vince_M
Sr. Member
****
Posts: 321


View Profile
« Reply #39 on: February 08, 2019, 11:06:55 PM »

I improved the accuracy of the top carb scoop with styrene and Tamiya putty.
When you use Tamiya putty you will never go back to Squadron putty again!


Logged
Mark Joyce
Sr. Member
****
Posts: 408


View Profile
« Reply #40 on: February 09, 2019, 12:10:28 AM »

Nice work on the carburetor scoop, Vince.  I never realized that Mauve one was off that much but it's been awhile since I've built the kit.  Yes, Tamiya putty is great.  For some reason my tube has just about dried up so I need to order another.  I've heard fairly good things about Squadron's newly formulated putty but have yet to try it.
Logged

Ignorance is bliss
Vince_M
Sr. Member
****
Posts: 321


View Profile
« Reply #41 on: February 10, 2019, 12:22:34 AM »

I don't trust my ability to airbrush freehand so I made these masks for the medium green "dapples" on the wings.
They are being stored on wax paper until needed.

Logged
Vince_M
Sr. Member
****
Posts: 321


View Profile
« Reply #42 on: February 10, 2019, 01:04:10 AM »

Mark,
The carb scoop is not that bad on the kit...I'm just a perfectionist!
It needed to extend forward a little and the sides had a very sharp inner corner instead of the blend I see on real Warhawks.
Logged
Mark Joyce
Sr. Member
****
Posts: 408


View Profile
« Reply #43 on: February 10, 2019, 09:56:21 AM »

I feel likewise about my freehand abilities so did the same as you for another P-40N build a few years back.  If I recall correctly, I place small strips of Blu-tack under my template to soften the edges of the splotches...and I'm currently at exactly that point in painting the splotches on a 72nd Hasegawa P-40N that I finally decided to finish after sitting half-built in its box for years.

Logged

Ignorance is bliss
Vince_M
Sr. Member
****
Posts: 321


View Profile
« Reply #44 on: February 14, 2019, 01:04:58 PM »

Well...
The photoetch canopy rails I found at a model show vendor were really very necessary.
The kit did not have any rails so having an open canopy would not look great.
So I put them in but spent a lot of time and it nearly drove me nuts.
Mainly my eyesight is not a good as when I was a little younger...
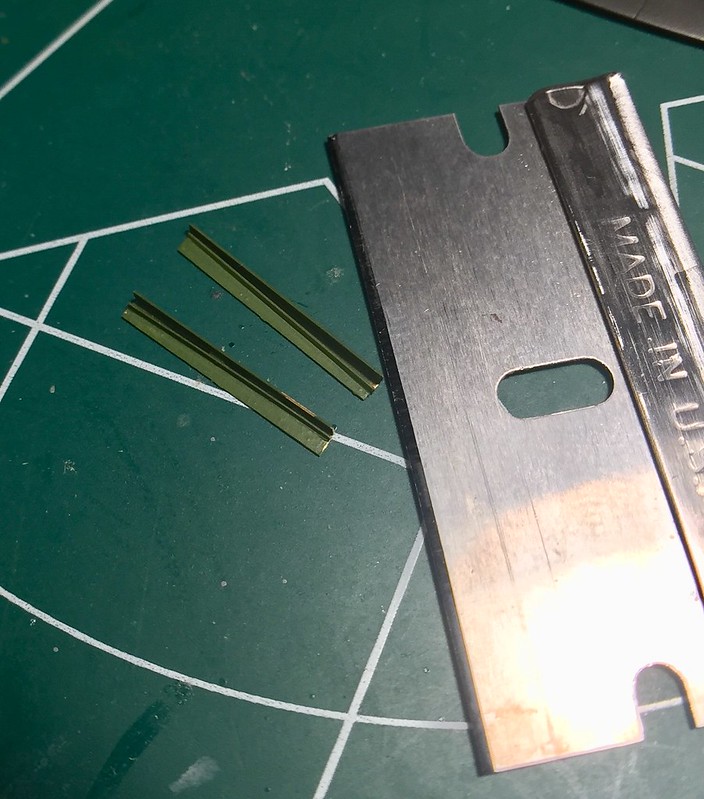


You can see here that I have had to add some strip styrene so that the rails will be deep enough from the fuselage sides.
I got lucky as the strip I had on hand was just right in thickness.
First, I had to "tack" them in place and then follow up with superglue.
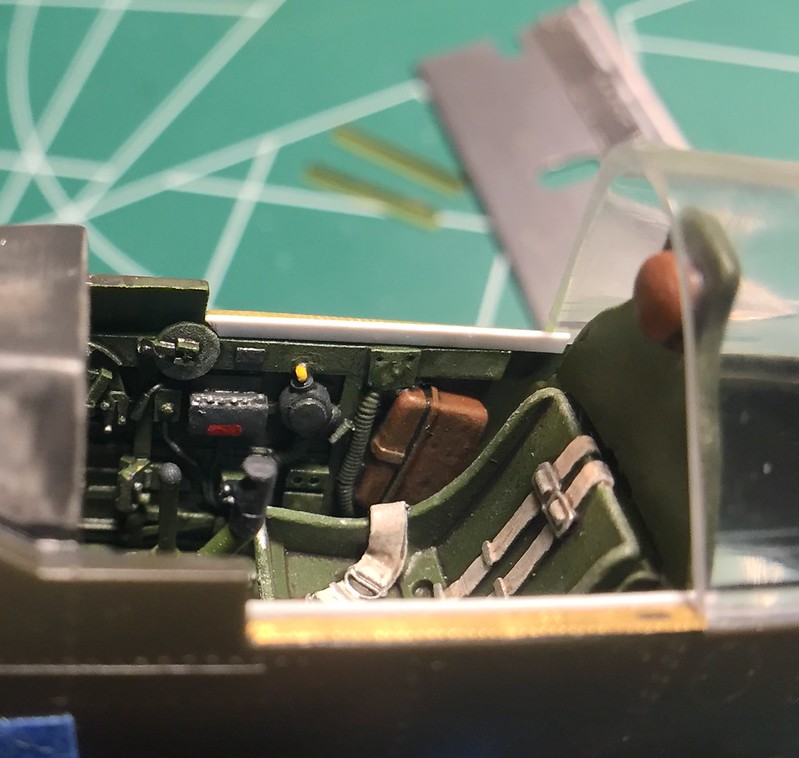


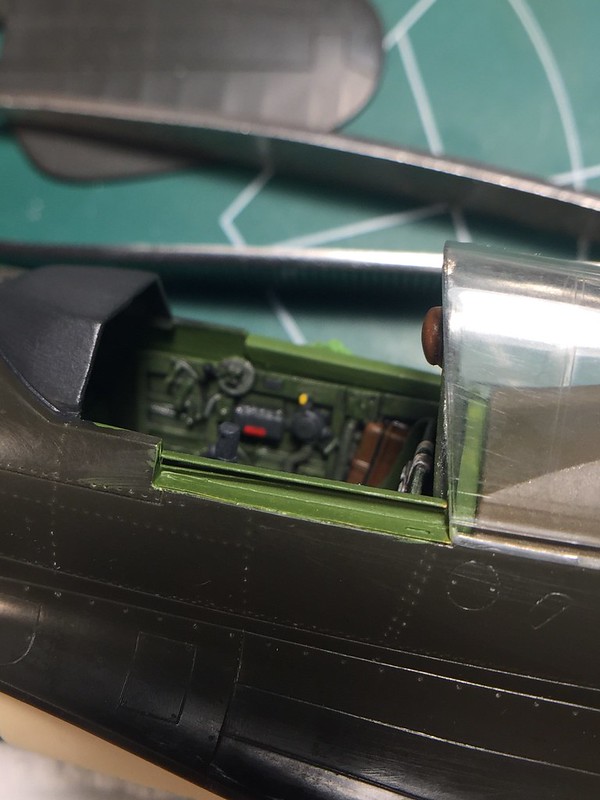
Here is the result.  I'm happy but it sucked up a lot to time and the model show is not far off now.
Good news is that the cockpit area will be done soon and I will be able to add the wing and finish the "body work" prior to primer.
Logged
Pages: 1 2 [3] 4 5 ... 8
  Print  
 
Jump to:  

Powered by MySQL Powered by PHP Powered by SMF 1.1.21 | SMF © 2015, Simple Machines Valid XHTML 1.0! Valid CSS!